上一篇介绍了如何在Windows、macOS、Ubuntu上安装docker,安装完成后,我们将开始正式学习docker。Docker的三大核心概念分为是:镜像、容器和仓库,在本篇,我们将介绍第一个核心概念----镜像。
1. 简介
Docker镜像(Image),一个镜像是一个只读的用于创建docker容器(container)的指令模板,包括了程序运行所需的全部依赖包(包括程序、库、资源、配置等)。通常,镜像基于另一个镜像,并进行自定义。镜像是只读的、可运行的,运行后的镜像即为容器(Container)。
1.1. 镜像的几个概念
通过docker images查询本地的镜像列表时,可以看到镜像有REPOSITORY、ID、TAG等字段,镜像包含几个概念,首先需要弄清楚它们间的关系:
Registry
镜像注册表,用来存储镜像数据的地方,官方的Docker hub就是一个公共的Registry,另外,还可以通过官方的registry镜像搭建私有的镜像注册表。通常所说的镜像仓库是泛指Registry,但并不完全准确,一个Registry可以包含多个Repository。
例如,拉取镜像:docker pull registry.hub.docker.com/ubuntu:18.04,这里的registry.hub.docker.com就是官方提供的镜像注册表,可以省略不写。
Repository
镜像库,包含多个镜像,存储于Registry中。在仓库搜索镜像时,按名称搜索在registry中查找repository。例如,我们所说的nginx镜像,一般就是指的nginx的Repository,它包含多个nginx镜像,它们通过tag来区分。
Tag
镜像的标签,一般用来作为版本区分,默认不写Tag为latest,一个Image有多个Tag。
Image
具体的镜像,有唯一的GUID和多个Tag。
简单而言,一个Registry包含多个Repository,每个Repository包含多个Image,每个Image有多个Tag,但是ID是唯一的。
1.2. 镜像层
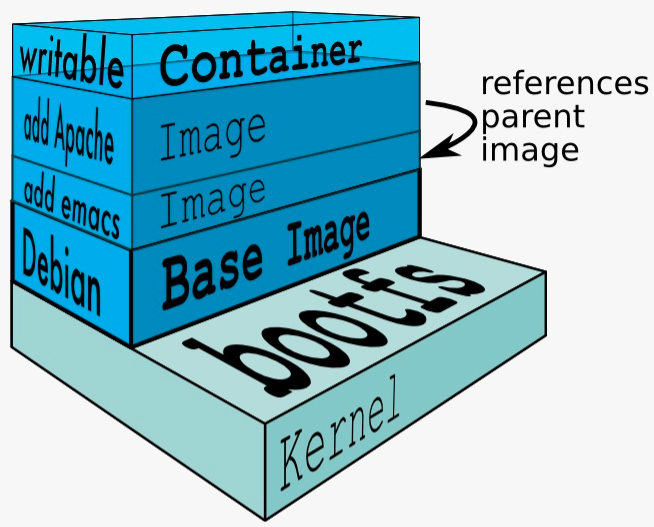
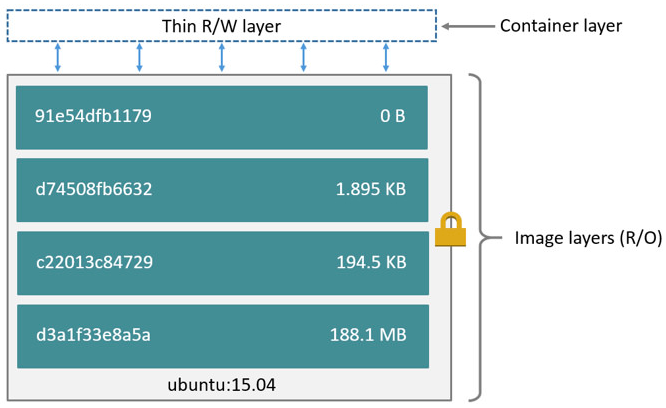
镜像由不同的层(layer)组成。一般而言,Dockerfile每一个指令都会创建一个层,每层只是与之前图层的一组差异,它们都有自己的GUID,并且堆叠在彼此之上。当创建新容器时,将会在基础层的顶部添加新的可写层,称为“容器层”,对正在运行的容器所做的所有更改(例如,写入新文件、修改现有文件和删除文件)都将写入此可写容器层。

以镜像ubuntu15.04为例,运行一个容器,下图展示了其基本结构:

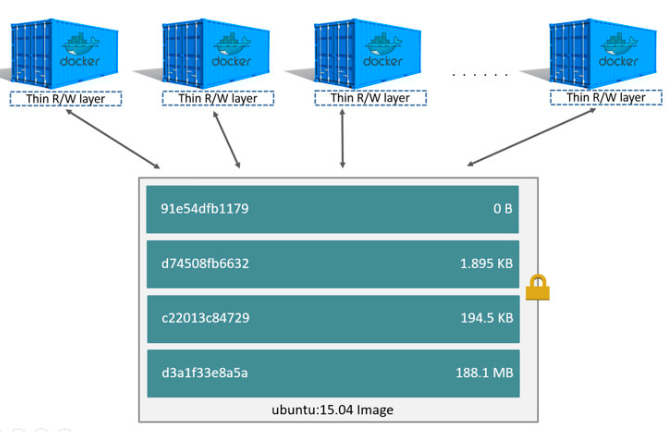
上图展示了一个容器层(container layer)和镜像的多个镜像层(image layer)。其实,容器和镜像最主要的区别就在于容器层,容器层可读写,新写入或者修改的数据都存储在容器层上。基于同一镜像的不同容器都有自己的不同容器层,但是对于底层的各个镜像层,各个容器是共享的。当容器被删除后,只需删除该容器的容器层即可。可以看到,Docker通过层的设计极大地复用了资源,这也是docker轻量和快速的主要原因。

2. 镜像基本操作
接下来,我们看看镜像的一些基本操作。
2.1. 拉取镜像
拉取镜像意思是从镜像的Registry中将镜像下载到本地,类似于Git的pull拉取代码,命令如下:
docker image pull [OPTIONS] NAME[:TAG|@DIGEST]
选项包括:
-a, --all-tags: 拉取镜像的所有标签
--disable-content-trust: 是否跳过镜像验证,默认为
true
例如:docker pull registry.hub.docker.com/ubuntu:18.04
2.2. 镜像查询
1、查询列表
查询本地的所有镜像:
docker image ls
等同于docker images,例如:
root@ubuntu:~# docker images
REPOSITORY          TAG                 IMAGE ID            CREATED             SIZE
local/mynginx       latest              4d24e58d851d        26 hours ago        108MB
python              1.0                 22a7b6b93718        5 days ago          131MB
nginx               latest              f68d6e55e065        2 weeks ago         109MB
python              2.7-slim            ca96bab3e2aa        5 weeks ago         120MB
hello-world         latest              fce289e99eb9        6 months ago        1.84kB
ubuntu              14.10               a8a2ba3ce1a3        4 years ago         194MB
列表信息包括:
REPOSITORY: 镜像来自于的镜像仓库TAG: 镜像版本/标签信息IMAGE ID: 镜像的ID,唯一标示一个镜像,如果镜像的ID相同,说明指向同一个镜像,只是标签不同CREATED: 镜像的创建时间SIZE: 镜像大小
2、查询镜像详细信息
docker [image] inspect [OPTIONS] IMAGE [IMAGE...]
结果展示为JSON格式,例如:
root@ubuntu:/etc/docker# docker image inspect ubuntu:latest
[
    {
        "Id": "sha256:4c108a37151f54439950335c409802e948883e00c93fdb751d206c9a9674c1f6",
        "RepoTags": [
            "myubuntu:latest",
            "ubuntu:latest"
        ],
        "RepoDigests": [
            "ubuntu@sha256:9b1702dcfe32c873a770a32cfd306dd7fc1c4fd134adfb783db68defc8894b3c"
        ],
        "Parent": "",
        "Comment": "",
    ……
}
3、查询镜像历史信息
查询镜像的每层创建的历史信息:
docker [image] history [OPTIONS] IMAGE
例如:
root@ubuntu:~# docker history nginx
IMAGE               CREATED             CREATED BY                                      SIZE                COMMENT
f68d6e55e065        2 weeks ago         /bin/sh -c #(nop)  CMD ["nginx" "-g" "daemon…   0B
<missing>           2 weeks ago         /bin/sh -c #(nop)  STOPSIGNAL SIGTERM           0B
<missing>           2 weeks ago         /bin/sh -c #(nop)  EXPOSE 80                    0B
<missing>           2 weeks ago         /bin/sh -c ln -sf /dev/stdout /var/log/nginx…   22B
<missing>           2 weeks ago         /bin/sh -c set -x     && addgroup --system -…   54.1MB
<missing>           2 weeks ago         /bin/sh -c #(nop)  ENV PKG_RELEASE=1~stretch    0B
<missing>           2 weeks ago         /bin/sh -c #(nop)  ENV NJS_VERSION=0.3.3        0B
<missing>           2 weeks ago         /bin/sh -c #(nop)  ENV NGINX_VERSION=1.17.1     0B
<missing>           5 weeks ago         /bin/sh -c #(nop)  LABEL maintainer=NGINX Do…   0B
<missing>           5 weeks ago         /bin/sh -c #(nop)  CMD ["bash"]                 0B
<missing>           5 weeks ago         /bin/sh -c #(nop) ADD file:5ffb798d64089418e…   55.3MB
2.3. 添加镜像标签
为了便于标识镜像,可以给镜像添加标签,一般为版本号来区分:
docker [image] tag SOURCE_IMAGE[:TAG] TARGET_IMAGE[:TAG]
例如,为nginx镜像添加标签:
root@ubuntu:~# docker tag nginx:latest mynginx:0.1
root@ubuntu:~# docker images
REPOSITORY          TAG                 IMAGE ID            CREATED             SIZE
mynginx             0.1                 f68d6e55e065        2 weeks ago         109MB
nginx               latest              f68d6e55e065        2 weeks ago         109MB
可以看到,两个镜像的ID是相同的,只是TAG不同,说明他们指向的是相同的镜像。
2.4. 搜索镜像
有时候,需要查询镜像的一些信息,例如版本、是否为官方镜像等,需要使用镜像查询:
docker search [OPTIONS] TERM
选项:
-f, --filter filter: 过滤输出的内容
--format string: 格式化输出内容
--limit int: 显示结果的最大条数,默认为25条
--no-trunc: 不截断输出结果信息,默认内容太长自动截断
举例:
root@ubuntu:~# docker search --filter stars=50 nginx
NAME                      DESCRIPTION                                     STARS               OFFICIAL            AUTOMATED
nginx                     Official build of Nginx.                        11665               [OK]
jwilder/nginx-proxy       Automated Nginx reverse proxy for docker con…   1623                                    [OK]
richarvey/nginx-php-fpm   Container running Nginx + PHP-FPM capable of…   724                                     [OK]
bitnami/nginx             Bitnami nginx Docker Image                      68                                      [OK]
linuxserver/nginx         An Nginx container, brought to you by LinuxS…   65
2.5. 镜像删除
1、使用标签删除镜像
docker rmi NAME[:TAG]
等同于docker image rm,如果本地有容器依赖镜像,删除时会出错,可以进行强制删除,但是不推荐,正确的做法是先删除依赖镜像的容器,再删除镜像。
选项:
-f: 强制删除
--no-prune: 不清理不带标签的父镜像
举例:
root@ubuntu:~# docker image rm hello-world:latest
Error response from daemon: conflict: unable to remove repository reference "hello-world" (must force) - container 9368b46af2eb is using its referenced image fce289e99eb9
root@ubuntu:~# docker image rm -f hello-world
Untagged: hello-world:latest
Untagged: hello-world@sha256:41a65640635299bab090f783209c1e3a3f11934cf7756b09cb2f1e02147c6ed8
Deleted: sha256:fce289e99eb9bca977dae136fbe2a82b6b7d4c372474c9235adc1741675f587e
例子想要删除hello-world镜像,但是删除出错,因为容器依赖了该镜像,加上-f强制删除之。
2、根据ID删除镜像
docker rmi ID
等同于docker [image] rm ID,如果根据镜像id删除镜像,那么docker会先删除镜像的标签,然后在删除镜像。由于id是相同的,所有不同标签的镜像实质是同一镜像。根据ID删除镜像,会输出已删除的各层信息:
root@ubuntu:~# docker image rm 4c1
Untagged: myubuntu:lastest
Untagged: ubuntu:latest
Untagged: ubuntu@sha256:9b1702dcfe32c873a770a32cfd306dd7fc1c4fd134adfb783db68defc8894b3c
Deleted: sha256:4c108a37151f54439950335c409802e948883e00c93fdb751d206c9a9674c1f6
Deleted: sha256:7c1abf1dbbfd02a48330a7317ab45a6091d53e2e9cc062f0f3dbd2b7539947a6
Deleted: sha256:5a614dda4a54650168ee2cd30ce2e39576dad5c9a0d1907c02445687b4ea5090
Deleted: sha256:bd042113a73a5c9c6680990740446b7324afb39e243ade3d33bdaa9ffaf8d294
Deleted: sha256:ba9de9d8475e7f5e40086358a1353b3cc080994fc6d31e4272dd3acb69b0151e
3、清理镜像
镜像清理命令主要用于清理一段时间过后的临时镜像和不再使用的镜像,命令如下:
docker image prune [OPTIONS]
删除时会要求用户输入确认信息,参数:
-a, --all: 删除所有无用镜像,不只是临时镜像
-filter filter: 按照给定过滤条件清理
-f, --force: 强制删除,不进行确认提示
举例:
root@ubuntu:~# docker image prune
WARNING! This will remove all dangling images.
Are you sure you want to continue? [y/N] y
Total reclaimed space: 0B
root@ubuntu:~# docker image prune -f
Total reclaimed space: 0B
示例环境中,没有可以清理的镜像,所以清理空间为0。
2.6. 创建镜像
创建镜像有3种方式,但是最主要的方式还是使用Dockerfile来创建镜像。
1、基于已有容器创建
docker [container] commit [OPTIONS] CONTAINER [REPOSITORY[:TAG]]
选项:
-a, --author: 作者信息
-c, --change []: 提交的时候执行Dockerfile指令
-m, --message: 提交的信息
-p, --pause: 提交时暂停容器运行,默认为
true
举例:
(1)查看所有容器
root@ubuntu:~# docker ps -a
CONTAINER ID        IMAGE               COMMAND             CREATED              STATUS                      PORTS               NAMES
dda576fbf857        nginx               "/bin/bash"         About a minute ago   Exited (0) 29 seconds ago                       heuristic_hopper
(2)根据容器创建新镜像
root@ubuntu:~# docker container commit -m 'mynginx' -a "belonk.com" dda576 mynginx:1.0
sha256:3e9cd4c22198e867fbf237b3e46ebd127b1c0a71e2a7d2f69bb911882c0b8f75
(3)查看镜像
root@ubuntu:~# docker images
REPOSITORY          TAG                 IMAGE ID            CREATED             SIZE
mynginx             1.0                 3e9cd4c22198        21 seconds ago      109MB
nginx               latest              f68d6e55e065        9 days ago          109MB
可以看到镜像创建成功。
2、基于本地模板导入
改命令主要是支持从第三方提供的镜像模板文件导入为本地镜像:
docker [image] import [OPTIONS] file|URL - [REPOSITORY[:TAG]]
3、基于Dockerfile创建
Dockerfile是一个文本文件,利用一些docker指令集合来描述如何创建新镜像。Dockerfile包含了一条条的指令(Instruction),每一条指令构建一层(layer),因此每一条指令的内容,就是描述该层应当如何构建。一般而言,新镜像都是基于某个父镜像来创建,但是镜像树底层的根镜像可能没有依赖的父镜像。
有了 Dockerfile,当我们需要定制自己额外的需求时,只需在 Dockerfile 上添加或者修改指令,重新生成 image 即可,省去了敲命令的麻烦。
基于Dockfile创建镜像的详细过程我们将在后续再来讨论,这里先看一个官方的基于python的例子,大概了解一下其过程:
1、创建一个Dockerfile文件,其内容如下:
# Use an official Python runtime as a parent image
FROM python:2.7-slim

# Set the working directory to /app
WORKDIR ../app

# Copy the current directory contents into the container at /app
COPY . ../app

# Install any needed packages specified in requirements.txt
RUN pip install --trusted-host pypi.python.org -r requirements.txt

# Make port 80 available to the world outside this container
EXPOSE 80

# Define environment variable
ENV NAME World

# Run app.py when the container launches
CMD ["python", "app.py"]
Dockerfile由一条条的指令来定义(FROM、RUN等) ,每一个指令会构建镜像的一层。
2、在相同目录下创建requirements.txt、app.py文件,分别写入如下内容
requirements.txt
Flask
Redis
该文件定义了构建时所必须的python lib库。
app.py
from flask import Flask
from redis import Redis, RedisError
import os
import socket

# Connect to Redis
redis = Redis(host="redis", db=0, socket_connect_timeout=2, socket_timeout=2)

app = Flask(__name__)

@app.route("/")
def hello():
    try:
        visits = redis.incr("counter")
    except RedisError:
        visits = "cannot connect to Redis, counter disabled"

    html = "

=== Hello {name}!
"
           "**Hostname:** {hostname}
"
           "**Visits:** {visits}"
    return html.format(name=os.getenv("NAME", "world"), hostname=socket.gethostname(), visits=visits)

if __name__ == "__main__":
    app.run(host='0.0.0.0', port=80)
这是一个python程序,尝试连接redis,打印访问次数,如果连接不上,则输出错误信息。
3、构建进行
现在的文件目录为:
root@ubuntu:~# tree dockertest/
dockertest/
└── dockerfile
    ├── app.py
    ├── Dockerfile
    └── requirements.txt

1 directory, 3 files
使用如下命令构建镜像:
docker build --tag=frienthello:v0.0.1 .
--tag 可以简写为 -t,tag后边格式为[名称:版本],如果版本不写,则默认为latest。
4、运行程序
docker run -p 8080:80 friendlyhello
-p参数将docker的80端口和物理机的8080端口做了映射,访问物理机的8080端口则会被代理到docker的80端口上。
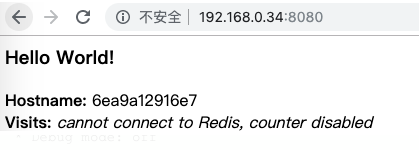
运行成功后,浏览器访问宿主机http://IP:8080端口,结果如下:

说明镜像编译成功,容器成功运行,只是无法连接到redis而直接输出错误信息。
2.7. 存储和载入镜像
镜像的存储和载入功能,可以很方便的在不同的机器上进行迁移,或者分享您的镜像。
1、镜像存储
镜像存储,即将本地镜像存储为压缩文件,然后将该文件传输到其他机器,或者分享给其他人,拿到镜像的人通过载入镜像即可使用该镜像。
docker [image] save -o FILE NAME[:TAG]
选项:
-o, --output string: 写入的镜像文件
举例:
root@ubuntu:~# docker image save -o hello-world.tar.gz hello-world
root@ubuntu:~# ls
dockertest  hello-world.tar.gz
2、镜像载入
镜像载入,即拿到存储的镜像压缩文件后,导入到本地即可使用镜像。
docker [image] load [OPTIONS] FILE
选项:
-i, --input string: 加载的镜像文件
-q, --quiet: 不输出详细信息
举例:导入刚才存储的镜像
root@ubuntu:~# ls
dockertest  hello-world.tar.gz
root@ubuntu:~# docker image load -i hello-world.tar.gz
af0b15c8625b: Loading layer [==================================================>]  3.584kB/3.584kB
Loaded image: hello-world:latest
root@ubuntu:~# docker images
REPOSITORY          TAG                 IMAGE ID            CREATED             SIZE
hello-world         latest              fce289e99eb9        6 months ago        1.84kB
2.8. 镜像共享
自己制作了比较好的镜像,可以分享到docker hub,给他人使用,这个过程类似于上传代码到Github代码库。我们来看看如下共享制作好的镜像:
1、登录docker hub
要分享镜像,首先需要注册Docker hub的账号。注册完成后,docker CLI执行登录命令:
docker login
然后根据提示输入您的账号密码即可:
root@ubuntu:~# docker login
Login with your Docker ID to push and pull images from Docker Hub. If you don't have a Docker ID, head over to https://hub.docker.com to create one.
Username: belonk
Password:
WARNING! Your password will be stored unencrypted in /root/.docker/config.json.
Configure a credential helper to remove this warning. See
https://docs.docker.com/engine/reference/commandline/login/#credentials-store

Login Succeeded
这里没有配置证书会出现警告信息,告诉您用户和密码明文存放的位置。
2、推送镜像到docker hub
虽然为镜像添加标签不是必须的,但是添加标签有助于提高镜像的辨识度。添加标签后,就可以推送镜像到docker hub了:
docker [image] push [REGISTRY_HOST[:REGISTRY_PORT] / ]NAME[:TAG]
例如,我这里推送的结果:
root@ubuntu:~# docker push belonk/get-started:part2
The push refers to repository [docker.io/belonk/get-started]
e5f602061734: Pushed
f32e000eff11: Pushed
c285b8372864: Pushed
a212ef9c5ee1: Mounted from library/python
a47fa5565167: Mounted from library/python
658556256f47: Mounted from library/python
cf5b3c6798f7: Mounted from library/python
part2: digest: sha256:d8e367652db2e0f814bf0ec384e2b00e0535a0146010c5df6fd2d75e6afeb942 size: 1787
完成后,此上传的镜像将公开发布。如果您登录到Docker Hub,则会看到推送的镜像及其pull命令。
3. 总结
关于镜像的介绍就到这里,总结一下:
1、镜像技术是docker轻量和高效的核心,由于镜像的层层叠加结构,多容器共享镜像层,而容器本身只创建本身的容器层,极大的提高了资源利用率
2、一般而言,镜像基于其他镜像构建,但是镜像树底层的根镜像也可能没有依赖其他父镜像
3、镜像是容器的基础,不要混淆Registry、Repository、TAG、Image等概念
3、镜像基础操作命令总结:
# 查询所有镜像
docker image ls -a
# 搜索镜像
docker search IMAGE
# 移除镜像
docker image rm
# 移除所有镜像
docker image rm $(docker image ls -a -q)
# 清理镜像
docker image prune
# 存储镜像
ocker image save -o FILE NAME[:TAG]
# 载入镜像
docker [image] load [OPTIONS] FILE
# 使用docker hub账号登录CLI
docker login
# 给镜像做标记
docker tag  username/repository:tag
# 上传镜像到镜像注册表
docker push username/repository:tag
# 从镜像注册表中运行镜像
docker run username/repository:tag